-
项目启动
Vue2:new Vue()  创建应用
Vue.use()  使用插件
Vue.component()  注册全局组件

Vue3:
// 创建一个vue应用
// 1. 导入createApp函数
// 2. 编写一个根组件App.vue,导入进来
// 3. 基于根组件创建应用实例
// 4. 挂载到index.html的#app容器

import {createApp} from 'vue'
import App from './App.vue'
const app = createApp(App)
app.mount('#app')
-
生命周期
对于生命周期来说,整体上变化不大,只是大部分生命周期钩子名称上 + “on”,功能上是类似的。不过有一点需要注意,Vue3 在组合式API(Composition API,下面展开)中使用生命周期钩子时需要先引入,而 Vue2 在选项API(Options API)中可以直接调用生命周期钩子,如下所示。
// vue3
<script setup>
import { onMounted } from 'vue';   // 使用前需引入生命周期钩子

onMounted(() => {
  // ...
});

// 可将不同的逻辑拆开成多个onMounted,依然按顺序执行,不会被覆盖
onMounted(() => {
  // ...
});
</script>

// vue2
<script>
export default {
  mounted() {   // 直接调用生命周期钩子
    // ...
  },
}
</script>
常用生命周期对比如下表所示。
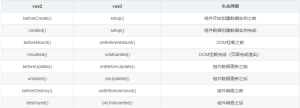
setup 是围绕 beforeCreate 和 created 生命周期钩子运行的,所以不需要显式地去定义。
import {
  defineComponent,
  onBeforeMount,
  onMounted,
  onBeforeUpdate,
  onUpdated,
  onBeforeUnmount,
  onUnmounted,
  onErrorCaptured,
  onRenderTracked,
  onRenderTriggered,
} from "vue";
export default defineComponent({
  //beforeCreate和created是vue2的
  beforeCreate() {
    console.log("------beforeCreate-----");
  },
  created() {
    console.log("------created-----");
  },
  setup() {
    console.log("------setup-----");
    // vue3.x生命周期写在setup中
    onBeforeMount(() => {
      console.log("------onBeforeMount-----");
    });
    onMounted(() => {
      console.log("------onMounted-----");
    });
    onBeforeUpdate(() => {
      console.log("------onBeforeUpdate-----");
    });
    onUpdated(() => {
      console.log("------onUpdated-----");
    });
    onBeforeUnmount(() => {
      console.log("------onBeforeUnmount-----");
    });
    onUnmounted(() => {
      console.log("------onUnmounted-----");
    });
    onErrorCaptured(() => {
      console.log("------onErrorCaptured-----");
    });
    onRenderTracked(() => {
      console.log("------onRenderTracked-----");
    });
    // 调试哪些数据发生了变化
    onRenderTriggered((event) => {
      console.log("------onRenderTriggered-----", event);
    });
  },
});
-
多根节点
// vue2中在template里存在多个根节点会报错
<template>
  <header></header>
  <main></main>
  <footer></footer>
</template>

// 只能存在一个根节点,需要用一个<div>来包裹着
<template>
  <div>
    <header></header>
    <main></main>
    <footer></footer>
  </div>
</template>

// 但是,Vue3 支持多个根节点,也就是 fragment。即以下多根节点的写法是被允许的。
<template>
  <header></header>
  <main></main>
  <footer></footer>
</template>
-
Options API 与 Composition API
Vue 组件可以用两种不同的 API 风格编写:Options API 和 Composition API。
-
Options API
使用 Options API,我们使用选项对象定义组件的逻辑,例如data、methods和mounted。由选项定义的属性在 this 内部函数中公开,指向组件实例,如下所示。
<template>
  <button @click="increment">count is: {{ count }}</button>
</template>

<script>
export default {
  data() {
    return {
      count: 0
    }
  },
  methods: {
    increment() {
      this.count++;
    }
  },
  mounted() {
    console.log(`The initial count is ${this.count}.`);
  }
}
</script>
-
Composition API
使用 Composition API,我们使用导入的 API 函数定义组件的逻辑。在 SFC 中,Composition API 通常使用
<template>
  <button @click="increment">Count is: {{ count }}</button>
</template>

<script setup>
import { ref, onMounted } from 'vue';

const count = ref(0);

function increment() {
  count.value++;
}

onMounted(() => {
  console.log(`The initial count is ${count.value}.`);
})
</script>
-
异步组件(Suspense)
Vue3 提供 Suspense 组件,允许程序在等待异步组件加载完成前渲染兜底的内容,如 loading ,使用户的体验更平滑。使用它,需在模板中声明,并包括两个命名插槽:default 和 fallback。Suspense 确保加载完异步内容时显示默认插槽,并将 fallback 插槽用作加载状态。
<tempalte>
  <suspense>
    <template #default>
      <List />
    </template>
    <template #fallback>
      <div>
        Loading...
      </div>
    </template>
  </suspense>
</template>
在 List 组件(有可能是异步组件,也有可能是组件内部处理逻辑或查找操作过多导致加载过慢等)未加载完成前,显示 Loading...(即 fallback 插槽内容),加载完成时显示自身(即 default 插槽内容)。
-
Teleport
Vue3 提供 Teleport 组件可将部分 DOM 移动到 Vue app 之外的位置。比如项目中常见的 Dialog 弹窗。
<button @click="dialogVisible = true">显示弹窗</button>
<teleport to="body">
  <div class="dialog" v-if="dialogVisible">
    我是弹窗,我直接移动到了body标签下
  </div>
</teleport>
-
路由
使用 createRouter 工厂函数来创建路由实例,然后将其传递给根组件使用:
import { createRouter, createWebHistory } from 'vue-router'
import HelloWorld from './components/HelloWorld.vue'
const routes = [
  { path: '/', component: HelloWorld }
]

const router = createRouter({
  history: createWebHistory(),
  routes
})
export default router
-
请求
在 Vue 3.0 中,官方推荐的 HTTP 请求库是 axios 的替代品—— vite-plugin-mock,该库内置了一套基于 axios 的请求拦截和响应拦截机制,并且已经在 Vite 中默认启用了。这种方式可以大大减少编写重复代码的工作量,同时也支持更好的类型推断和类型校验(使用 async/await 来封装请求代码)。
-
代码上
import组件
<template>
    <Chart />
</template>  <script setup>
   // 必须将后缀补全
   //  一个import即可,无需在组件属性中添加,因为<script setup> 会自动把组件注册到当前组件
   import Chart from './chart.vue'
</script>
Vue2不能v-if v-for 同时使用,因为v-for会先执行,但Vue3可以:
<div v-if="show">
  <div v-for="item in items" :key="item.id">{{ item }}</div>
</div>
Vue3 v-bind可以省略
v-model :
<input v-model="count" type="number">
<!-- 等价于 -->
<input :value="count" @input="count = $event.target.value" type="number”>


<el-dialog v-model:visible="isVisible" v-model:content="content"></el-dialog>
<!-- 相当于 -->
<el-dialog
    :visible="isVisible"
    :content="content"
    @update:visible="isVisible"
    @update:content="content"
></el-dialog> 摒弃 .sync ,直接使用v-model
定义全局变量:
// 之前(Vue 2.x)
Vue.prototype.$http = () => {}
Vue.prototype.url= 'http://123'
// 之后(Vue 3.x)
const app = createApp({})
app.config.globalProperties.$http = () => {}
app.config.globalProperties.url= 'http://123'
插槽slot:
// vue2.0使用插槽基本上直接使用slot进行操作,其中vue2.0经历了两次更迭,2.6.0版本slot升级为v-slot
<div>
    <slot :current="toolTipData" name="test"></slot> // 具名 作用域插槽
    <slot></slot> //默认插槽
</div>
//父组件调用该组件
<test>
    <template>
       <div>默认插槽</div>
    </template>
     // 作用域插槽
    <template slot-scope="{ current }" slot="test">
       <el-form label-width="80px" :model="current">
         <el-form-item label="id:">
           <el-link type="info">{{ current.id }}</el-link>
         </el-form-item>
       </el-form>
     </template>
</test>
//==============vue3.0使用插槽
//在vue3.0中,插槽使用v-slot 简写用#
<div>
   <slot name="test" :newData="slotsData"></slot>
   <slot></slot>
</div>
<HelloWorld msg="Welcome to Your Vue.js + TypeScript App">
    <template #default> // 可以写为v-slot:default  #后面跟的是插槽名称
       <div>默认插槽</div> </template>
     //作用域插槽
    <template #test="{ newData }"> // 可以写为v-slot:test="newData"
      <p>{{ newData.aa }}</p>
      <p>{{ newData.bb }}</p>
    </template>
</HelloWorld>
//一个组件里面具有多个插槽时,一定要带上名称,否则可能会导致作用域错乱
toRefs 用于将一个 reactive 对象转化为属性全部为 ref 对象的普通对象:
<template>
  <div>
    <p>计数:{{ num }}s</p>
    <p>主人年龄:{{ person.age }}</p>
    <p>主人姓名:{{ person.name }}</p>
    <p>动物类别:{{ atype }}</p>
    <p>动物名称:{{ aname }}</p>
    <p>动物年龄:{{ aage }}</p>
  </div>
</template>
<script>
import { defineComponent, reactive, ref, toRefs } from "vue";
export default defineComponent({
  setup() {
    //使用ref声明基本类型
    const num = ref(0);
    //使用ref声明对象
    const person = ref({ age: 20, name: "张三" });
    //使用reactive声明对象
    const animal = reactive({ atype: "猫", aname: "小花", aage: 5 });
    setTimeout(() => {
      person.value.age = person.value.age + 1;
      person.value.name = "李四";
      animal.aage++;
    }, 1000);
    setInterval(() => {
      num.value++;
    }, 1000);
    return {
      num,
      person,
      ...toRefs(animal),
    };
  },
});
</script>
Readonly只读变量:
import { reactive, readonly } from 'vue'

const original = reactive({ count: 0 })
const copy = readonly(original)

// 通过 original 修改 count,将会触发依赖 copy 的侦听器
original.count++
// 通过 copy 修改 count,将导致失败并出现警告
copy.count++ // 警告: "Set operation on key 'count' failed: target is readonly."
watch监听:
//监听reactive对象:
watch(
      () => animal.aage,
      (curAge, preAge) => {
        console.log("新值:", curAge, "老值:", preAge);
      }
    );

//监听ref变量
watch(num, (newVal, oldVal) => {
      console.log("新值:", newVal, "老值:", oldVal);
    });

//多个值的监听
watch([() => animal.aage, num], ([curAge, newVal], [preAge, oldVal]) => {
      console.log("新值:", curAge, "老值:", preAge);
      console.log("新值:", newVal, "老值:", oldVal);
    });

//监听对象复杂时,请使用深度监听 让函数的第三个参数为deep:true
watch(
      () => state.animal,
      (newType, oldType) => {
        console.log("新值:", newType, "老值:", oldType);
      },
      { deep: true }
    );

//停止监听函数
   const stopWatchRoom = watch(
      () => state.animal,
      (newType, oldType) => {
        console.log("新值:", newType, "老值:", oldType);
      },
      { deep: true }
    );
    setTimeout(() => {
      // 停止监听
      stopWatchRoom();
    }, 3000);
默认情况下,watch 是惰性的, 给第三个参数中设置immediate: true即可立即执行回调函数;